Multiple ACT LABS Light Guns for MAME using Windows XP
This is a experimental version of MAME 104u6. It contains code
that allows you to use multiple light guns in MAME. You can use
more then 2 light guns, as long as the total of mice and light guns
does not exceed 8. This functionality only applies when running
this test version on Windows XP. Older versions of windows use
the regular functionality as described in the documentation supplied
with the guns.
Hooking up the light guns is the same as in the documentation.
Except that you can use more then 2 devices. Any
combination of 1-Player and 2-Player guns can be used. They
will each be recognized individually.

If you have the 2-Player light gun, you can leave it on position
1. You can use the 2 position to change the 2 buttons from
buttons 1 & 2, to buttons 3 & 4. Giving you the ability
to control extra functions.
In this version you no longer need to use the -lightgun or -dual_lightgun commands. But you must use the -mouse command. If you are running a game that needs you to shoot off screen, you will still need to use the -offscreen_reload command. This will change the functionality of button 2 to fire off screen, thereby reloading.
For this version of MAME, mice and light guns are considered the same.
The test setup I used had 3 mice and 2 light guns. The mice
are Mouse 1, 2 & 3. The light guns are Lightgun 4 & 5.
This does not mean that you have 4 or 5 light guns. This is
just the mouse position windows assigns them. With light guns,
only the X,Y axis data is different then the mouse data, so you will
see the buttons reported as mouse 4 & 5 and the X,Y axis reported
as Lightgun 4 & 5. Your mouse and light gun numbers may be
different then the numbers show here.
To use light guns in this version of MAME you would use a command similar to this:
mame yourgame -mouse -r 800x600 -refresh 60
yourgame = is the name of the romset you are using
-r 800x600 -refresh 60 = sets the game to use a fixed
resolution and refresh. This is so you do not have to constantly
re-calibrate your gun.
When you are in the game, you will need to select the light gun as a
control. Do this by pressing the [TAB] key. You will now
see this menu.

Select "Input (this Game)". You will now see a menu similar to this:

Move down so you can select the fire trigger. This is "P1 Button 1".
Press enter and it will be ready for input like so:

Press the trigger button on the gun you want to use for player 1.
You will now see something similar to this.
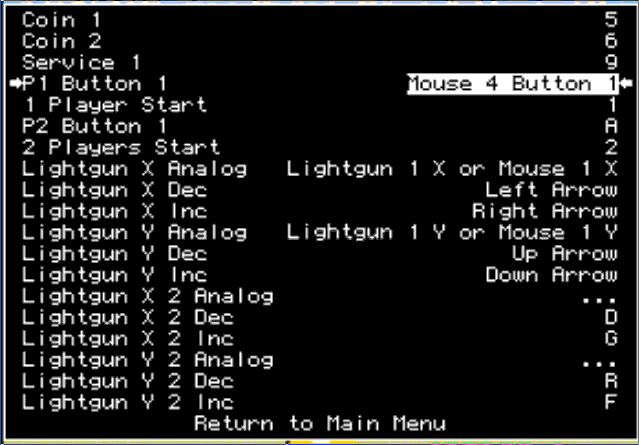
It shows "Mouse 4 Button 1" instead of "Lightgun 4 Button 1". This is normal.
A light gun is a mouse. Only the X,Y data is different.
Now we need to move on to selecting the light gun axes. Move down to highlight the "Lightgun X Analog".
Do not press enter yet.

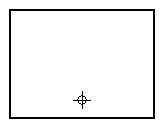
Before we can proceed we need to position the light gun on the left side of the screen.
Point at the position shown here and fire.

Now press enter to allow selection of the light gun's X axis.
We will now move to the right side of the screen and fire at the position shown here.

Try and keep the vertical position close to the same line.
You now should have the X-axis selected as shown here:

We will repeat the procedure for the Y-axis. Move down to highlight "Lightgun Y Analog".
Do not press enter yet.

Before we can proceed we need to position the light gun on the top half of the screen.
Point at the position shown here and fire.

Now press enter to allow selection of the light gun's Y axis.
We will now move to the bottom half of the screen and fire at the position shown here.
Try and keep the horizontal position close to the same line. You now should have the Y-axis selected.

Repeat the whole procedure for the other players as needed.
You are now ready to play.
-----
If you are interested in knowing what mice or light guns are reported
as which Mouse in MAME, try using the verbose command. When you
quit the game you will see a list showing each device.
mame yourgame -mouse -verbose