


Congratulations on purchasing the MEGA Arcade Cabinet!
You are in for hours and hours of "retro gaming fun". We have prepared this simple document to get you started to become familiar with your cabinet. Since you will need to understand some "basics" to get going we will go through the basics of powering up, playing and customizing the games. If you want further help with getting in to more depth with MAME or the DreamAuthentics Menu system you will have to consult their sites on the web (see links at the bottom of the page.)
*Please Double Click any of the images for a larger view
FIRST TIME POWER ON
Before you power on the game you want to make sure it survived "the shipment" intact. We have provided the best quality, professional packaging and shipping during the process but with everything ELECTRONIC that is FRAGILE you want to make sure everything is still connected.
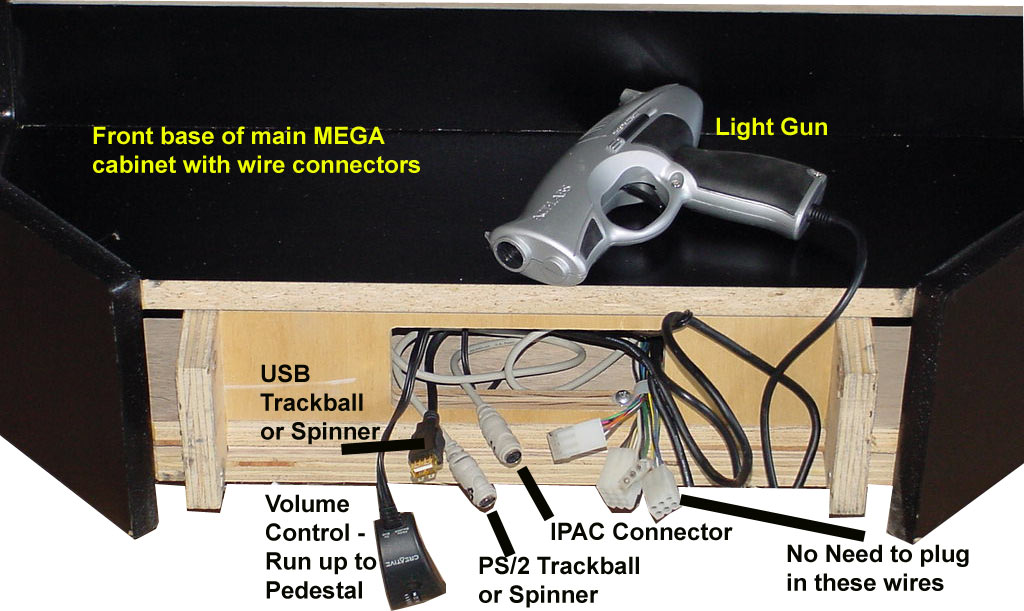
Take off the front cover. The pictures below show what it looks like when the door is off.
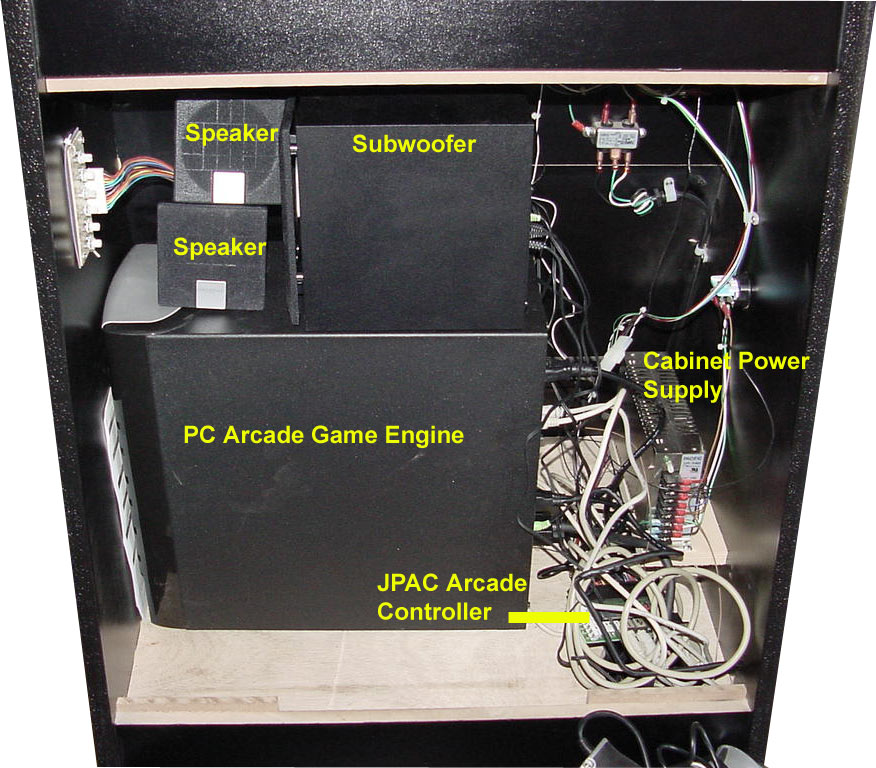


Plugging in the JPAC controller from your joystick
control panel:
There are several wires that you need to plug in to make the cabinet work
properly. They will be outlined below.
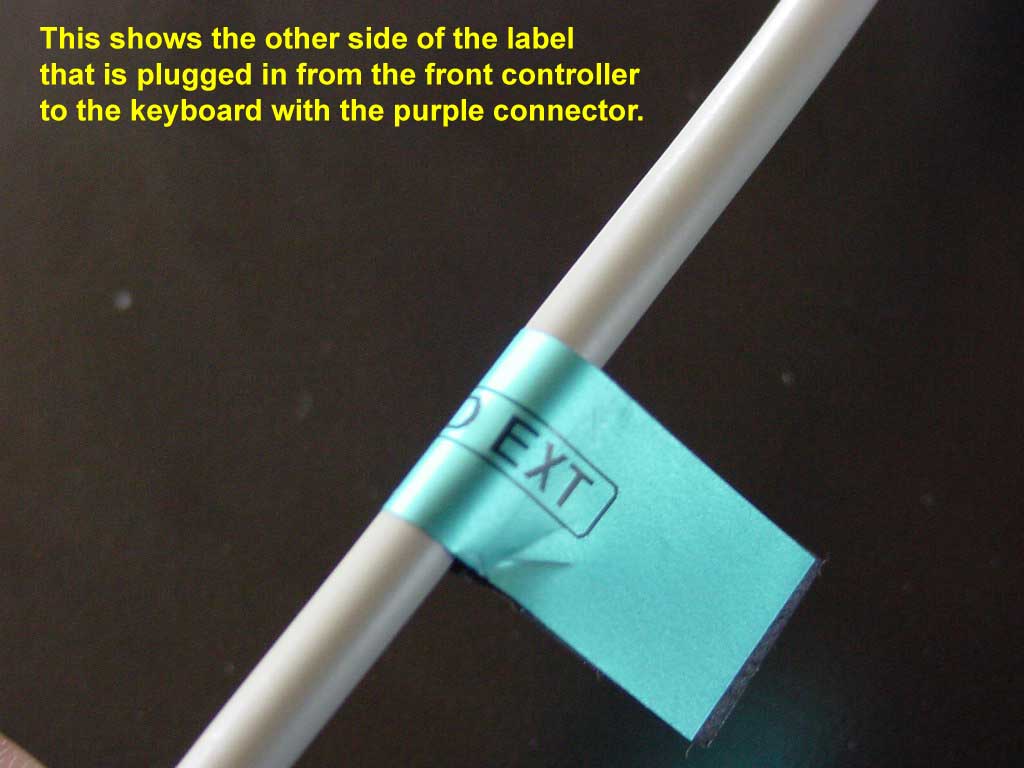
1. Keyboard Extension cable (PS/2 Style): This is a cable that comes out from the back of the joystick unit – usually with tape – you simply plug the arcade machine’s keyboard to this wire. This wire goes INSIDE the joystick control panel and is hooked to the IPAC board.
2. Joystick to JPAC cable (PS/2 Style): This is a cable that comes out from the back of the joystick unit and connects in to the JPAC in the back of the arcade cabinet (computer circuit board). http://www.dreamauthentics.com/excaldocs/DSC02024.JPG - if you are looking at the JPAC pictured here – the cable needs to be plugged in to the MIDDLE port (as indicated on the picture). This cable actually comes from the IPAC inside the joystick unit and connects directly to the JPAC
3. Computer to JPAC cable (PS/2 Style): The 3rd PS/2 style connector goes from the computer’s KEYBOARD PORT (usually purple on the back of your computer) to the JPAC. This supplies the power to the JPAC and is also the key that allows for the display to go on your arcade monitor as it is decoded from the computer.
4. Trackball Cable (USB or PS/2 Style): The trackball is usually a BLACK cable that has both a PS/2 and USB connectors. Depending on how you want to connect it to the computer, we usually recommend you plug this black cable (coming out of the back of the joystick unit) to the computer’s MOUSE PORT (usually green on the back of the computer) – so in essence instead of having a mouse – you will use the joystick’s trackball to control the movement of the cursor on the screen and 2 of the buttons on the joystick control panel will serve as the mouse’s left and right buttons. If you want to RETAIN the computer mouse then you will want to plug the trackball in to one of the USB ports
5. Spinner Cable (USB or PS/2 Style): The spinner is also usually a BLACK cable that has both a PS/2 and USB connectors. Most of the time you will want to plug this in to one of your USB ports on the back of your computer.


CLICK HERE FOR DETAILED SYSTEM WIRING DIAGRAM
(400k)
CLICK HERE FOR DETAILED
**USB** SYSTEM WIRING DIAGRAM
(300k)
*NOTE: On some of the newer systems, IT IS REQUIRED to use the USB connection
diagram.
Next, you want to make sure the monitor plugs are still in and also acquaint yourself with the locations of all the monitor adjustments. Everything has already been set optimally on the monitor before shipping but if something needs to be adjusted you will know where everything is.
HOOKING UP THE QUAD CONTROL PANEL
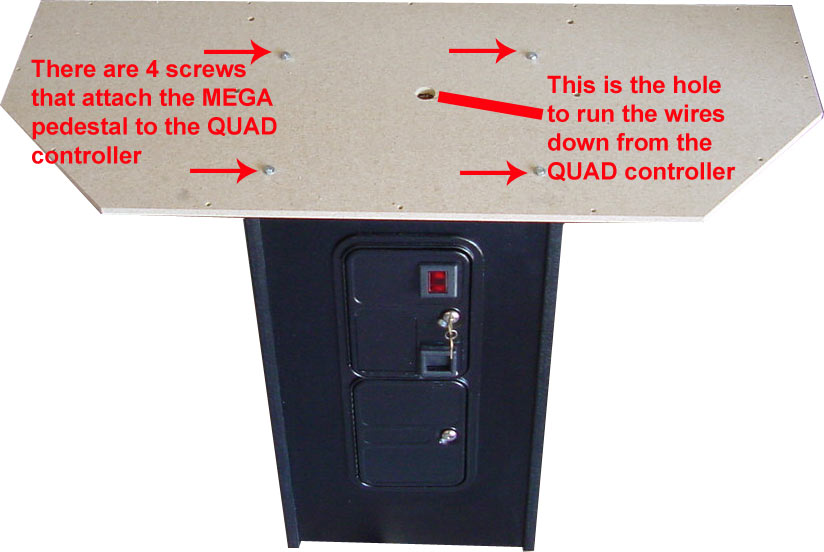
We will now hook up the QUAD control panel to the wood
base on the pedestal. If the wooden BASE of the QUAD controller is not attached
yet, now is the time to use the 4 included bolts. Simply bolt the QUAD
control panel BASE to the PEDESTAL. This will create a secure base for the QUAD
control panel - the final thing you need to do is push the 4 wires from the QUAD
controller down through the base of the control panel.
Once the QUAD control panel base is secured and the wires
are fed through the hole, you then need to SECURE THE TOP QUAD CONTROL PANEL to
the base with the provided screws. Place the QUAD control panel ON TOP OF the
base (which should now be secured on the pedestal). Once you have the QUAD BASE
edges FLUSH with the QUAD control panel you need to simply fasten the BASE to
the control panel with the screws provided. Use a Phillips screw driver and
simply go around the base and securely fasten the screw that attach the base to
the control panel.

![]()
You will now need to remember to "fish the wires down" the pedestal (you can open the front coin door to assist you with this). Simply put your hand through the coin door and you can "push and feed" the wires out through the opening of the pedestal.
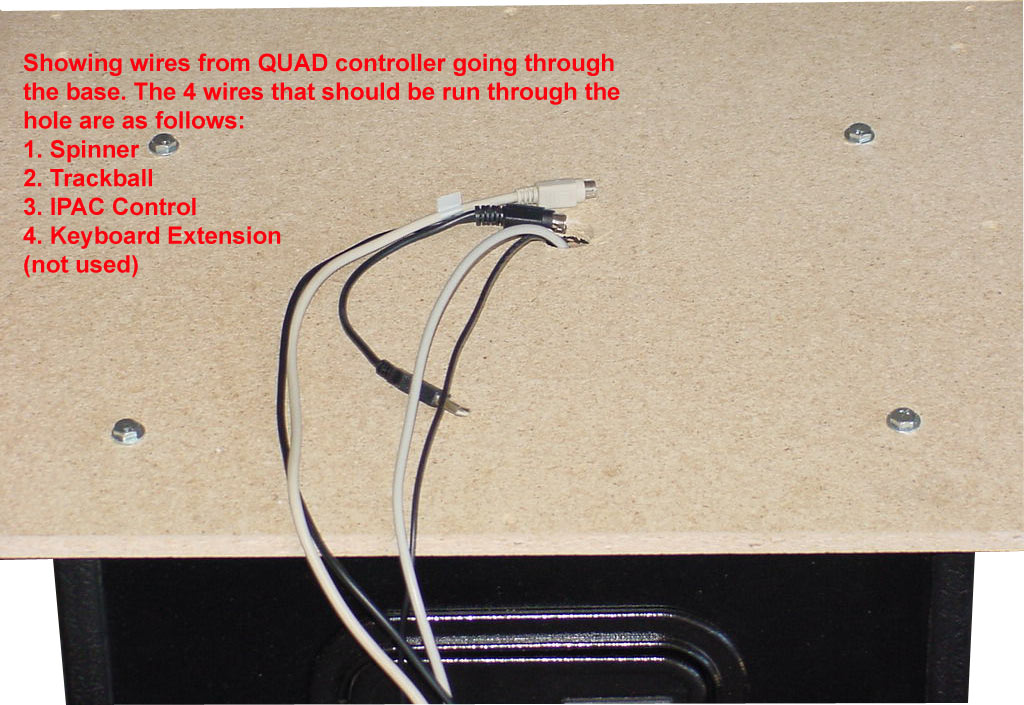
To finalize the wiring, simply attach the 4 wires from the base opening of the MEGA's pedestal (as pictured below) to the wires coming out of the bottom front of the main cabinet. Each wire should have a corresponding label for ease of attachment. The 4 wires are as follows: 1). Spinner, 2). Trackball, 3). IPAC Control Circuit Board, 4). Keyboard Extension (Not Used).

FINALIZING CABINET INSTALLATION
To finalize installation, simply attach the MEGA's pedestal to the main cabinet base unit (with monitor). You will see 4 (four) holes on the pedestal (2 on each side) - simply use the provided screws and screw in to secure the 4 bolts to the main unit. Note: Most of the time the 4 bolts are located in the BOTTOM coin door of the pedestal. To gain access you will need to use the provided key to open up the TOP coin door, get the BOTTOM coin door key from the inside hook and then open the bottom coin door.

TURNING ON THE CABINET
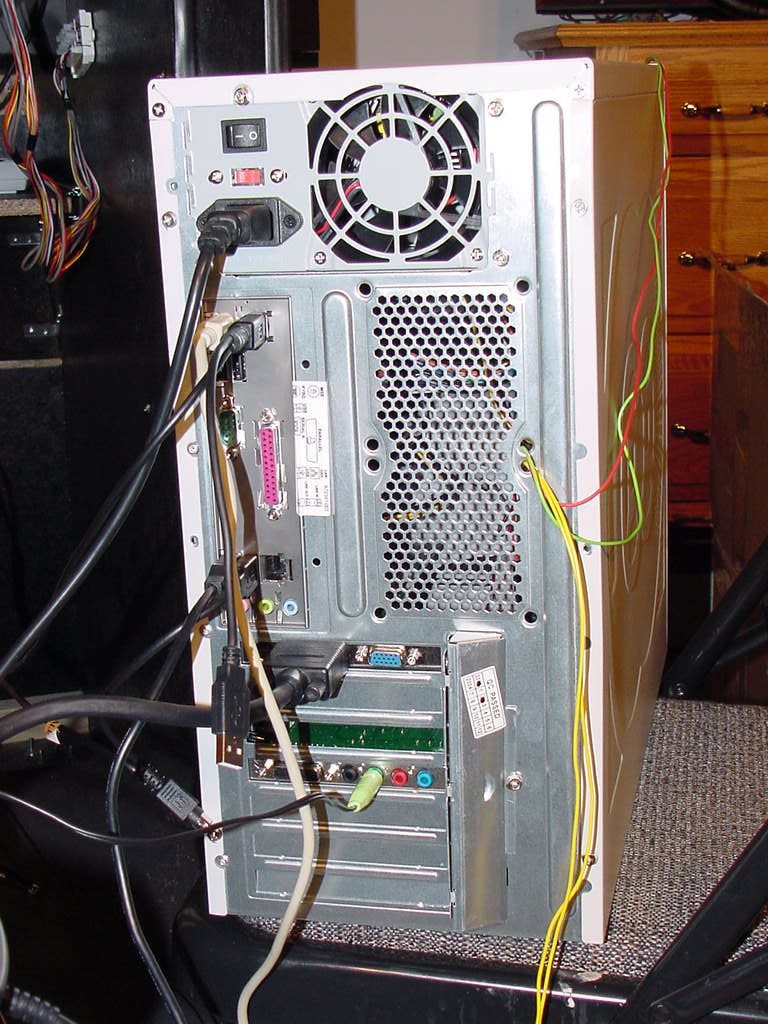
Once you are satisfied all the electronics are plugged in appropriately now is the time to turn on your arcade cabinet for the first time. Make sure that you have plugged in the 1 external power cord shown below.
Turn on the main power switch on the side panel. You will also notice there is a sound adjustment knob that can be run up the the main pedestal. This will adjust the 4 speakers and subwoofer system.
Once you power up the game and see the main menu (Be PATIENT, it takes about 45 seconds to fully boot up to the menu) you are ready to go. You use the BLUE joystick to select a game by holding it left or right (per the picture below). Once you highlight the game you want to play then hit the white 1 player or 2 player button (white) to LAUNCH/START the game.
Once a game is up you can hit the GREEN button to add 1 credit.
Once you have credits you can hit the white 1 player or 2, 3 or 4 player buttons to START the game!
NOTE: If you ever have a problem where the VIDEO IS NOT COMING UP or the SOUND IS NOT ON. 99% of the time the VIDEO CARD or the SOUND CARD has come loose during shipment. Simply open the computer case and "re-seat" both of these cards to make sure they are properly plugged in. It is always a good idea when shipping computers of any kind to make sure all the boards are plugged in properly before beginning play.
NOTE: Also, if you still don't hear the sound the chances are good that the plug for the speakers (green plug seen above) has come loose from the green socket in the sound card. Simply unplug and re-plug in the speaker wire and all should be fine. You may also want to check the MAIN VOLUME CONTROL to make sure the volume is on high enough.
+++++++++++++++
LIGHT GUN INFORMATION:
***NOTICE TO LIGHT GUN USERS:
If you have purchased a LIGHT GUN with your cabinet you will need to plug the LIGHT GUN in to a USB port in order for it to work correctly. (see pictures)
From the Joystick panel you will also need to plug the TRACKBALL PS/2 plug (not USB) in to the computer's Mouse port (the PS/2 mouse port is usually GREEN in color). **NOTE** If you don't plug the joystick trackball plug in to the PS/2 mouse port none of the controls will work properly. Also you WILL NOT be able to use a mouse if you have a light gun since there are not additional PS/2 ports.
2. Plug in the cable from the joystick panel labeled IPAC (Plug "B") in to the "B" labeled slot on the circuit board (see picture below) - Note: Plugs "A" and "C" should already be plugged in.
3. Plug in the cable from the computer keyboard in to the plug called KEYBOARD EXT coming from the joystick panel.
ATTENTION LIGHT GUN USERS:
Here are what the plug ins look like if you have a light gun. There is a slight modification with the light gun plug in configuration because the Light Gun MUST BE PLUGGED IN To a USB port (see pictures below). This means that YOU MUST NOW PLUG THE TRACKBALL IN TO THE MOUSE PS/2 PORT ON THE BACK OF THE COMPUTER (see pictures).
This is important during set up. If you plug the spinner in to the PS/2 mouse port on the back of the computer the system WILL NOT WORK. Please review the pictures for additional details. For LIGHT GUN USERS ONLY here is the order of the plug ins.
PS/2 Keyboard slot (white cord in picture below) = IPAC board wire
PS/2 Mouse slot (black cord in picture below) = Trackball
USB Port 1 or 2 = Light Gun
USB Port 1 or 2 = Spinner

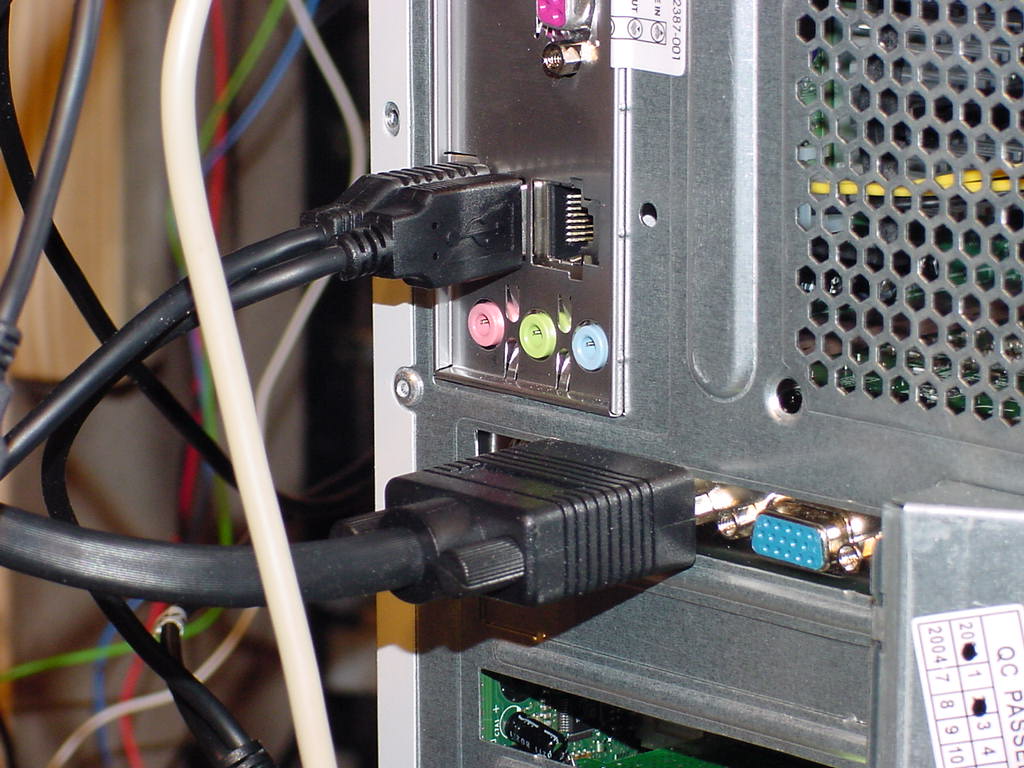


Also pictured above is the proper plug in configuration for the light gun. Basically plug the far left cable that comes from the main video circuit board (see picture below) in to the black box labeled ACT LABS. Then the video cable that comes from the light gun (act labs black box) gets plugged in to the back of the computer (see picture above) basically the "middle" VGA connector.
++++++++++++++++++++++++++++++++++++
CALIBRATING YOUR LIGHT GUN AND FAQ
Cailbrating your ACT LABS PC USB Light Gun is easy. Simply
turn the calibration switch (located on the right side of the gun) to the ON
position. The screen will go entirely white. Now wave your gun back and forth
both horizontally and vertically to all the screen extents. You should be
holding the gun approx. 1" to 3" from the screen.
Switch the calibration switch back to the original position, and you're ready to
start blasting things.
We have also noticed that when calibrating it is useful to wave the gun PAST
THE EDGES OF THE SCREEN (right, left, up and down) this will give a full
calibration of the ENTIRE arcade monitor.
VIDEO: Here is a link to a VIDEO SHOWING HOW TO CALIBRATE
YOUR LIGHT GUN. (13 MB to download)

The Calibration Switch
You can re-calibrate the gun each time you change screen resolutions, but it's fairly painless to do this, and only takes a second. Gun accuracy is greatly increased by calibrating it.
Once calibrated, the gun acts a mouse in Windows, simulating a left-mouse click wherever you “point and shoot.” The second button on the side of the gun acts as a right-mouse click. You can, in fact, use the gun as a mouse for everything except “click and drag” operations.
When do you need to calibrate the gun?
Although it is not necessary to calibrate the gun, we recommend you do so for ultimate gun accuracy. Ideally you should calibrate the gun whenever you enter a new game. Enter the game you wish to play and begin the calibrate process.
You need to calibrate whenever your actual screen resolution (and/or monitor refresh rate) changes. So for example if you play one game at 800x600 resolution, calibrate the gun in-game. Then if you play another game which is now running at 1024x768 resolution, you should calibrate the gun again.
The calibration process is simple and only takes a few
seconds to complete.
LIGHT GUN FREQUENTLY ASKED QUESTIONS
When I boot up my arcade cabinet the screen is all
white
A: The calibration switch is turned on - simply refer to the above diagram
and move the calibration switch back to the correct position.
Why is my monitor blank at boot-up when I have the PC
USB Gun connected?
A: This is part of the normal operation. The PC USB Gun draws its power from the
USB port. There is no power to the USB ports at boot-up until these ports are
enabled by your computer. Since the monitor signals pass through the PC USB Gun,
there will be no signals to your monitor initially.
When I move the calibration switch forward to calibrate
the PC USB Gun, there is no white screen on the monitor?
A: Either your monitor is not VGA/SVGA compatible or not a standard computer CRT
monitor. Also, make sure you have your video card in non-interlaced mode.
When I move the calibration switch forward to
calibrate, the screen does not turn totally white?
A: First try a different refresh rate (75Hz is best). Also, try a different
resolution if possible.
Even after calibration, why do my shots not line up
with where I shoot on-screen?
A: During calibration, the PC USB Gun learns the limits of your monitor, not
your application screen. Make sure the application screen is stretched to the
limits of your monitor, then calibrate again.
I connect my PC USB Gun, but nothing happens. Windows
doesn't detect it.
A: Try a different USB Port on your computer. Remember that the USB Gun will
only work on Windows 98 Second Edition, Windows ME, Windows 2000 and Windows XP.
Older versions of Windows are not supported. Also make sure that your USB ports
are not disabled in your system BIOS. Finally, make sure you have the latest
version of DirectX installed on your system.
Windows detects the PC USB Gun, but when I shoot I can
never hit a target.
A: The gun is most likely not calibrated properly. Different games use different
screen resolutions, and you may have to calibrate the gun as soon as you get
into a specific game. Follow the calibration instructions on this CD.
The PC USB Gun was working in one game, but it won't work in another.
A: Again, this has to do with screen resolution. Every time the screen
resolution changes, you have to re-calibrate the gun
If I shoot towards the corners of the screen, sometimes
the shots do not register.
A: You have to make sure that your desktop area is maximized so that the actual
screen image is taking up all of your monitor's area. You should not have any
black border around your screen image. You may have to manually adjust your
monitor's vertical and horizontal settings to maximize your screen image. Check
your monitor's manual for instructions.
What is the best refresh rate to use with the gun?
A: For optimal performance, a rate of 75 Hz is recommended, but the gun should
perform equally well using refresh rates between 60 and 150 Hz. The maximum
refresh rate is dependent on your monitor. We suggest you check your monitor's
technical specifications by either referencing the manual, or the manufacturer's
website. Pushing your monitor past it's rated refresh rate can cause serious
damage and may void your monitor's warranty.
In some MAME games, my shots don't seem to be
accurate?
A: This is an issue of the game software, not a light gun issue. Some games will
not line up properly with the light gun. The light gun is very accurate with
most MAME games though.
My shots are always a little to the right or left of
where I shoot. How can I fix this?
A: If your shots seem to be going to the left of the screen, try shifting your
screen a little to the right using your monitor controls and then calibrate the
light gun. After calibration, you can move your screen back to its original
position. Do the opposite for shots going to the right of the screen.
++++++++++++++++++++++++++++++++++++
POWER DOWN PROCEDURES
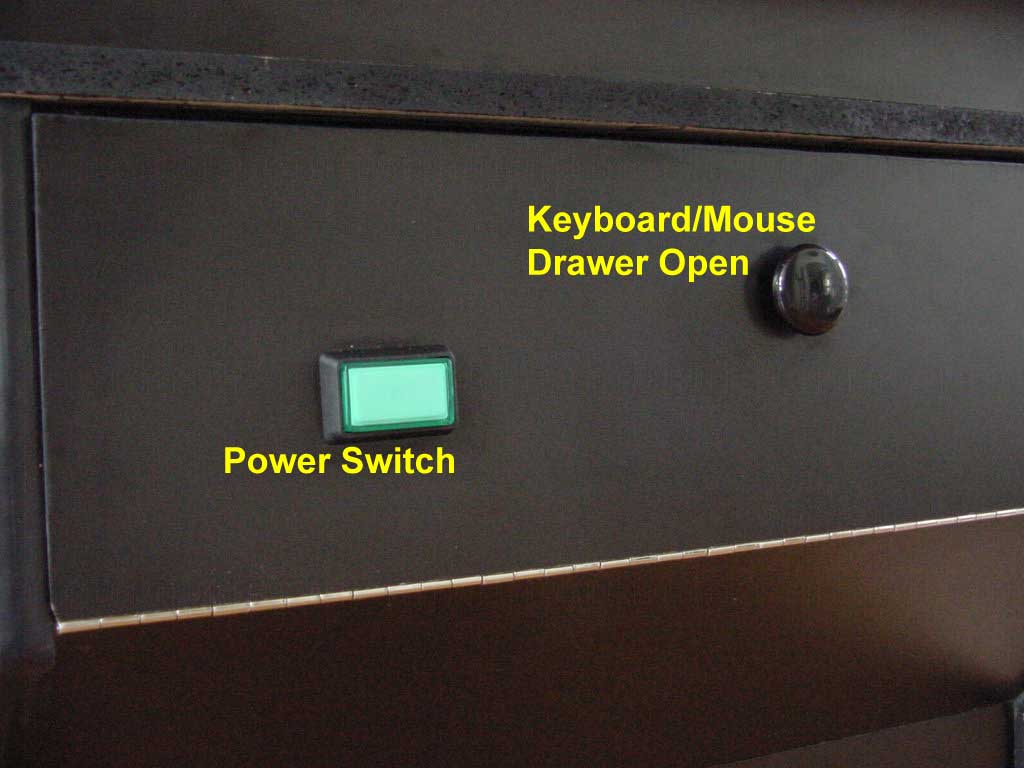
FINAL NOTE: If your cabinet is installed with Windows XP, FIRST escape out of the main game menu (should be upper left black escape key on most of our control panels) and then you just touch the power button on the front and the cabinet will shut down in an orderly fashion.
***NOTE, VERY IMPORTANT***
NEVER UNPLUG THE POWER CORD WHILE IN MAME OR IN WINDOWS. THIS COULD PERMANENTLY DAMAGE YOUR MAME SYSTEM BY CORRUPTING KEY GAMES AND FILES AND WILL VOID ALL WARRANTIES. YOU SHOULD ALWAYS USE THE POWER DOWN PROCEDURES LISTED ABOVE.
YOU ARE READY TO PLAY! HAVE FUN!
++++++++++++++++++++++++++++++++++++++++++++++++++++
CUSTOMIZATION MENUS via MEGA's proprietary 3 step process:
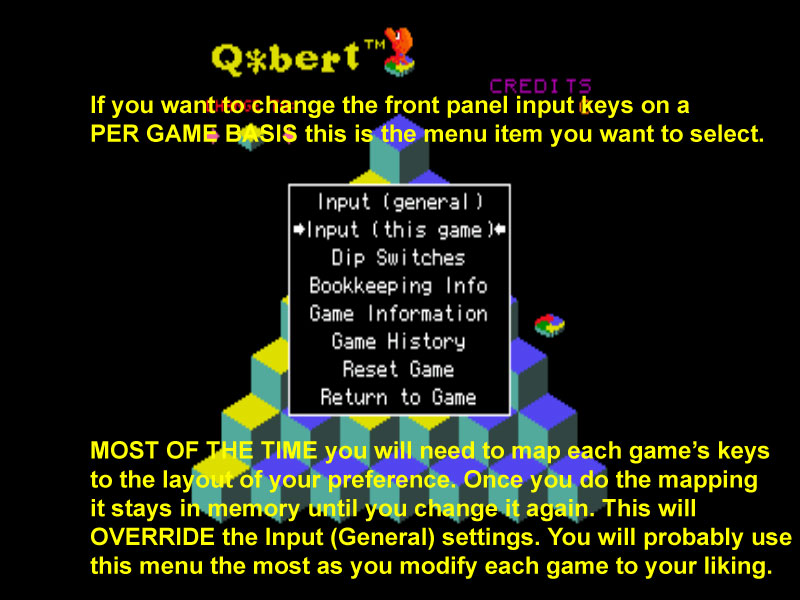
Changing joystick or game buttons for any game:
Here are illustrated pictures of the joystick control panels. This is a SPECIAL joystick control panel that uses AUTHENTIC arcade controls. We have programmed these in the most basic and flexible configuration. All button functions are fairly straightforward. These are the "default" configurations - you are welcome to change any of them at any time as long as you fully understand how to "change them back" if you have any problems.
Pictured below is a simple 3 step process to adjust ANY GAME's controls. Simply follow the pictures and use the other detail screens below as support examples. YOU NEVER NEED TO USE THE COMPUTER KEYBOARD OR MOUSE TO OPERATE ANY GAME OR PROGRAM ANY GAME after you have the buttons set up!
Step 1: You need to bring up the main menu. In order to do this simply hit the FAR LEFT and FAR RIGHT blue buttons AT THE SAME TIME (as pictured) to bring up the menu. These are the default factory configurations. If you change these you will need to hit the buttons that YOU assign. Also if you want to change them - see the instructions below.
Step 2: Now that the menu is up you want to scroll down (with top middle joystick) do the INPUT (THIS GAME) menu item. This will allow you to customize all the controls in this game. Once you have selected INPUT (THIS GAME) hit the FAR LEFT and MIDDLE BLUE BUTTONS AT THE SAME TIME which sends an "ENTER" code to select that menu item.
Step 3: Once in the specific game menu, simply use the top joystick to scroll down to the game function you want to change (for example Player 1 Fire) and hit the "ENTER" key as described in step 2 above. The menu is now waiting for you to select which button you want to assign to Player 1 fire key. Simply hit ANY BUTTON on the top joystick control panel that you want to assign to "player 1 fire" and that is all there is to it!
To close menu: Hit the black "ESCAPE" key on the top joystick control panel 2x to escape back to the game.


++++++++++++++++++++++++++++++++++++
"THE 33" MEGA MONITOR'S PICTURE NEEDS TO BE ADJUSTED - HOW DO I ADJUST THE 33" DISPLAY PICTURE?"
*NOTE: This is only valid for our MEGA cabinet with the 33" display
*NOTE: Make sure your desktop resolution on the MEGA
cabinet is 800x600 at 60HZ. Anything different will change the way you must
adjust the screen. All monitors leave the factory with picture perfect display.
It is not uncommon for some of the knobs to become "unadjusted" during transit
to your location so don't be concerned if you have a "scrolling" picture when
you get the monitor. It just needs some slight adjustments.
*NOTE: You will need a SMALL HAND MIRROR or a FLOOR MIRROR while adjusting the
monitor. Since you will be "reaching around the monitor" with one hand and
screwdriver to turn the knobs, you will need your right hand to hold a small
mirror in front of the monitor to make sure you can see what you are adjusting.
*NOTE: You will need a SMALL flat head screwdriver that will fit in the little
notch in each of the adjustment knobs. Without the small screwdriver you will
not be able to turn any of the knobs.
*NOTE: When going in to the back of your monitor, BE VERY CAREFUL of what you
are doing. Touching the wrong part with something metal could short circuit and
destroy your monitor. We cannot be responsible for any warranty repair work you
do beyond simply turning the knobs to adjust the picture.
*NOTE: BE CAREFUL when putting your hand in the back of the monitor - there is
high voltage electricity so be careful where you touch!
*NOTE: Click on any of the images below to enlarge
Step 1 is to adjust the controls underneath the monitor in back of the front
door. These are more like "fine tuning adjustment knobs".
Note: BE VERY CAREFUL NOT TO TURN THE KNOBS TOO FAR OR YOU COULD BREAK ONE OF
THEM OFF WHICH WOULD MAKE THE SCREEN NON ADJUSTABLE.
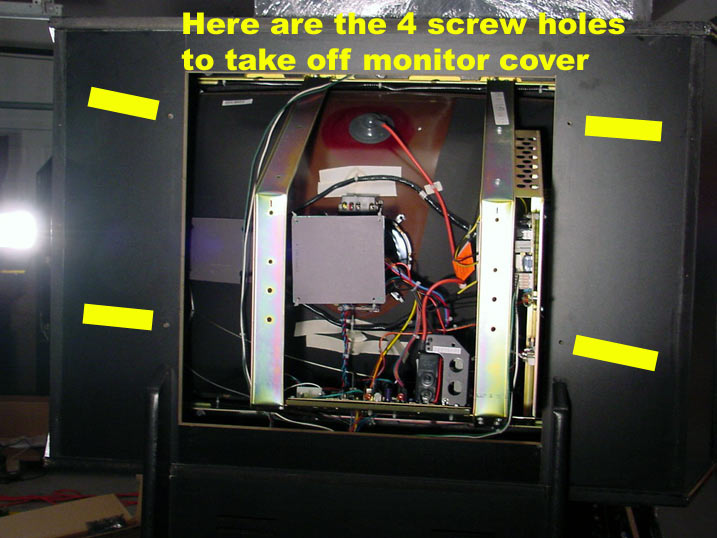
Here is the monitor with the cover taken off showing the
screw locations.
Step 2 is to further adjust the picture with the controls
in the back of the monitor. The first thing you need to do is unscrew the 4
screws on the back of the monitor cover. Please check out the picture below for
screw locations
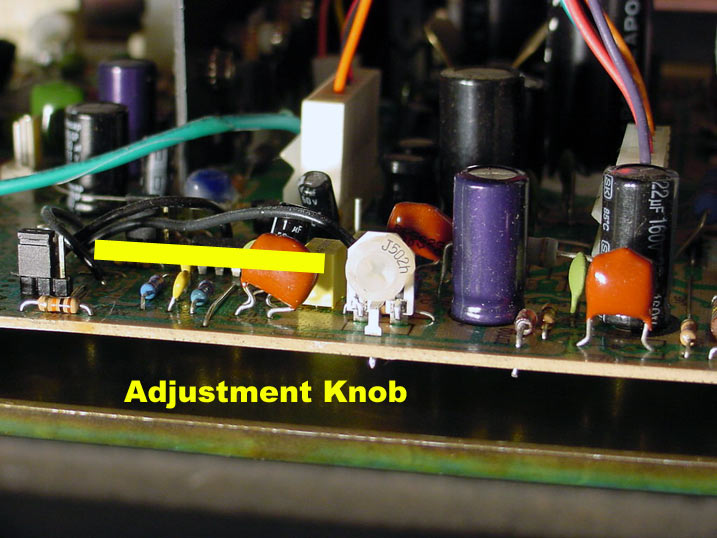
Step 3 is to "play with" the monitor adjustment knobs until you get the desired
result. That may sound a bit "unscientific" but that is really the best advice
we can give...because there are a myriad of ways to adjust these monitors - you
will quickly see which button affects the display differently as you work with
the knobs.

These two knobs are the MAIN adjustments and should always be
adjusted first. As with the other knobs, be CAREFUL while adjusting them because
if you try to go too far you could break the knob which would result in the
monitor not being able to have future adjustments.

Here is another view of the main adjustment knobs.

Here is one of the back adjustment knobs - back left.
Here is one of the front adjustment knobs - hear the front.
Once you have the optimal picture you can replace the monitor cover and screws.
You should never need to adjust it again unless perhaps you move the monitor
again.
We will leave you with a quote from one of our MEGA customers who followed these
instructions...have fun and happy adjusting.
"Super Street Fighter 2 takes up the ENTIRE screen. It’s the most
beautiful thing in the world. I think I’m going to cry. Thanks!"
Tom from Missouri
++++++++++++++++++++++++++++++++++++
"I TRIED TO BRING UP THE MAIN MAME GAME CUSTOMIZATION SCREEN AS OUTLINED ABOVE BUT I CANNOT GET THE MENU TO COME UP"
From time to time (we have no idea why - seems to be random) the main MAME default.cfg file (that holds all the button programming) gets corrupted and needs to be "reset". NO WORRIES by resetting this file you won't lose any of your high score data but you will have to re-program any of the game controls you have programmed thus far.
The procedure basically involves DELETING the default.cfg file (see picture below) in the C:\MAME\CFG directory. If you are an advanced user simply navigate (with the top trackball OR included mouse) to the C:\MAME\CFG directory, single click and select the default.cfg file and delete it.
If you are new to windows simply follow these quick
instructions:

1. "escape" all the way out of the main MAME game menu to
WINDOWS
2. Use the trackball and go to MY COMPUTER (then double click on it)
3. Use the trackball and select the "C:" drive (then double click on it)
4. Next, double click on the MAME folder, and finally double click on the CFG
folder.
5. You should see a list of files. We are looking for the DEFAULT.CFG file...or
quite simply the DEFAULT file.
7. The way you can tell the files are you can either SINGLE CLICK to select each
one and then do a RIGHT CLICK then go to PROPERTIES to tell you the name *OR*
you can go to the top of the OPEN WINDOW (You should see words like FILE, EDIT,
VIEW, et.c...) and single click on the VIEW word then go down and select DETAILS
- that should make another column that you can see everything (see the attached
menuopen.jpg file.
8. Once you find the DEFAULT.CFG file simply SINGLE click on it and hit the
DELETE KEY on your computer's keyboard. If asked if you are SURE IF YOU WANT TO
DELETE this file answer YES. THAT'S IT!
The next time you launch any MAME game from the main MAME menu a new default.cfg file is created and all the "default" values are loaded! Simple as that.
NOTE/IMPORTANT: When the default.cfg file is reset you lose all existing menu control for the MAME menu so none of the "TOP JOYSTICK CONTROLS" will be programmed from the step above entitled ("Changing joystick or game buttons for any game") so you will have to use the COMPUTER KEYBOARD to PROGRAM THESE KEYS AGAIN. Once you change them back you can follow the above instructions to program any game.
++++++++++++++++++++++++++++++++++++
"HOW TO RE-PROGRAM THE MAIN TOP JOYSTICK BUTTONS THAT
MODIFY GAMES AFTER DELETING THE DEFAULT.CFG FILE"
CLICK HERE FOR
VIDEO TUTORIAL (you will need windows media player 9 or above)
This is a fairly straightforward process to reset 3 commands which will allow you to program any game in MAME. The cool thing is that you can assign ANY KEYS to do this - not just the ones we have set up - which we think work the best ;) you can program any keys. For the sake of this example we are going to use the keys which are set as our default menu keys.
Since you will only be able to use the COMPUTER KEYBOARD at this time to program these functions get the main computer keyboard ready. Here are the steps:
1. Get to the main MAME game menu by rebooting or double
clicking the icon on the desktop
2. Launch ANY game
3. Once the game is up hit the TAB KEY on the computer keyboard. This will bring
up the main MAME menu system
4. Select INPUT (GENERAL)
5. After you do so the GENERAL commands are brought up (see picture below) these
are the "MAIN" MAME commands - NOT THE COMMANDS TO CUSTOMIZE INDIVIDUAL GAMES

6. The top selection says CONFIG MENU - this is the main
menu we just brought up. The DEFAULT is the COMPUTER TAB KEY. We are going to
change this to the left and right buttons next to the trackball (see picture
below)
7. Hit the "ENTER KEY" on the computer keyboard. Once done, you will see 2
"arrows" to the right part of the screen - it is now waiting for you to select a
"new" CONFIG MENU key. The cool thing with MAME is that we can use 2 buttons to
equate to 1 button...the reason this is important is you want to select keys
that during game operation are never pressed together. If you programmed the
wrong keys then every time someone was playing donkey kong and hit the jump key
then the menu would come up. We have selected the far left and right buttons
next to the trackball.
8. Now, AT THE SAME TIME, hit the far left and right buttons (pictured below). If you did this properly you will see 2 commands now
in the place where there used to be an arrow. If it did not "take" properly then
simply ESCAPE OUT of the menu and start over from step 6 above.
9. Assuming you got the CONFIG MENU programmed properly -
we will move on to the next step which is the "ENTER" key programming
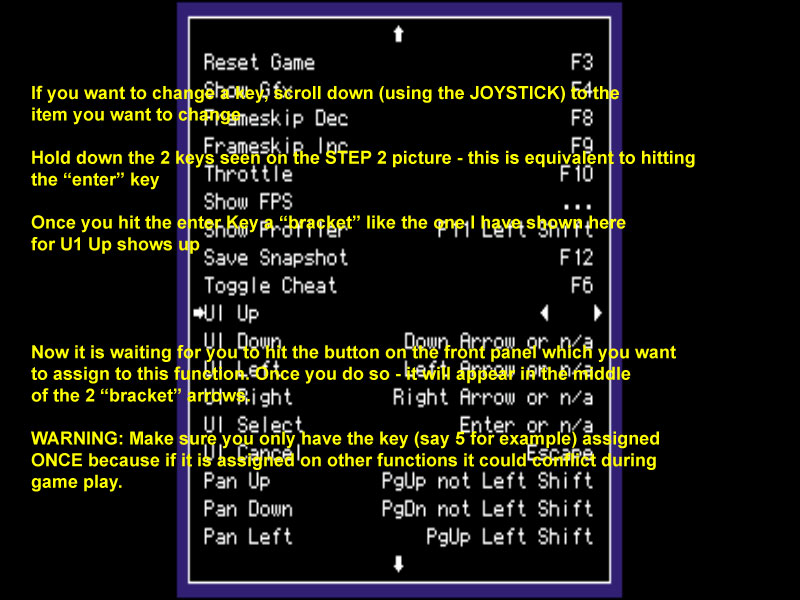
10. Use the top middle joystick (closest to the monitor) to scroll down the list
until you get to U1 SELECT (see picture below)
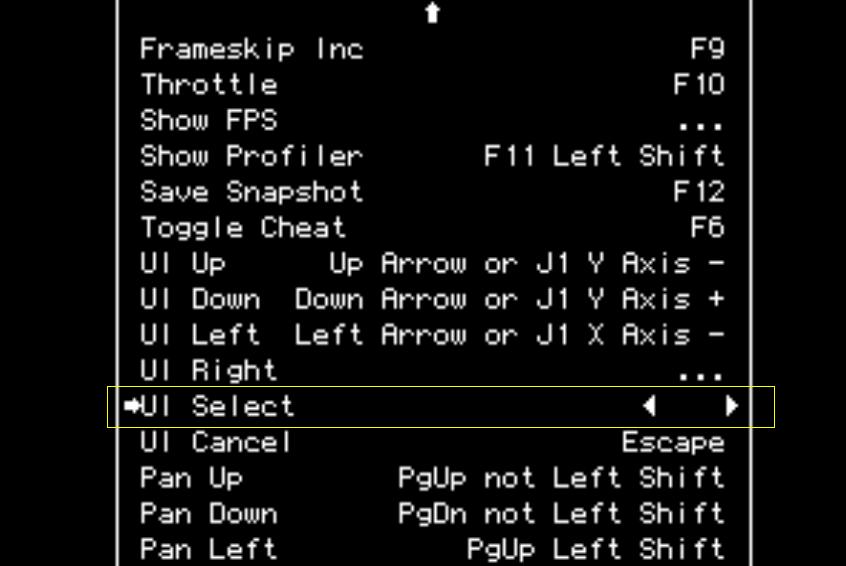
11. Same procedure as before, Hit the "ENTER KEY" on the computer keyboard. Once done, you will see 2 "arrows" to the right part of the screen - it is now waiting for you to select a "new" ENTER key.
12. Now, AT THE SAME TIME, hit the far left and middle buttons (pictured below). If you did this properly you will see 2 commands now in the place where there used to be an arrow. If it did not "take" properly then simply ESCAPE OUT of the menu and start over from step 6 above.
13. Assuming you got the ENTER programmed properly - we
will move on to the last step which is the "ESCAPE" key programming
14. Use the top middle joystick (closest to the monitor) to scroll down the list
until you get to U1 SELECT (see picture below)
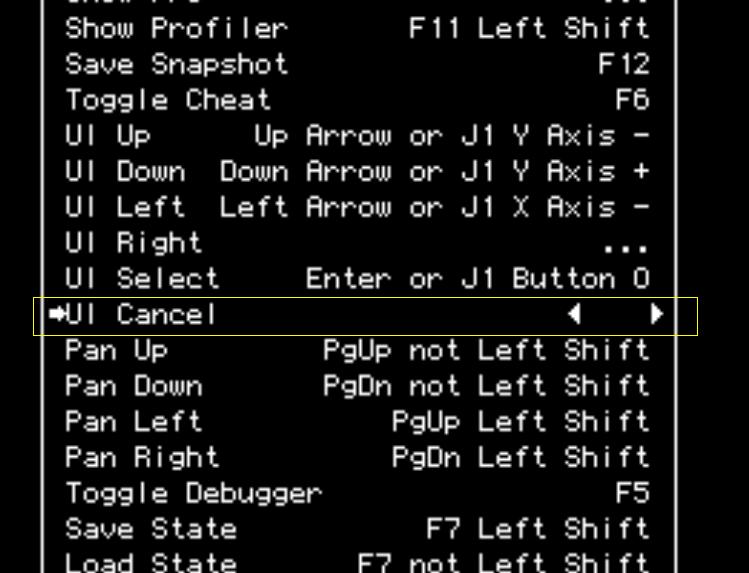
15. Same procedure as before, Hit the "ENTER KEY" **HINT, NOT THE ENTER ON THE COMPUTER KEYBOARD** ... REMEMBER, we just programmed a new ENTER KEY so this is a good way to test out if your "NEW" enter key worked...in this case press the LEFT and CENTER buttons to the right of the trackball AT THE SAME TIME. Once done properly, you will see 2 "arrows" to the right part of the screen - it is now waiting for you to select a "new" ESCAPE key.
16. Now, simply hit the black key at the top left of the control panel (this should be the only black key). If you did this properly you will see 1 command now in the place where there used to be an arrow. If it did not "take" properly then simply ESCAPE OUT of the menu and start over from step 6 above.
CONGRATULATIONS! You have now programmed the main 3 MAME keys, TAB, ENTER and ESCAPE! You can NOW to go the section titled "Changing joystick or game buttons for any game" and begin modifying the buttons for all your favorite games!
++++++++++++++++++++++++++++++++++++
Changing game video resolutions for any game:
I have also included additional detail screens below for you to adjust your video game resolutions. In MOST CASES the game will just come up correctly the first time. Since there are over 3,300 games in MAME (many of which I have not personally played) it is hard to have ALL resolutions 100% accurate. I have pre-programmed the top 15 or 20 games out there but there will probably be a game that you will want to change.

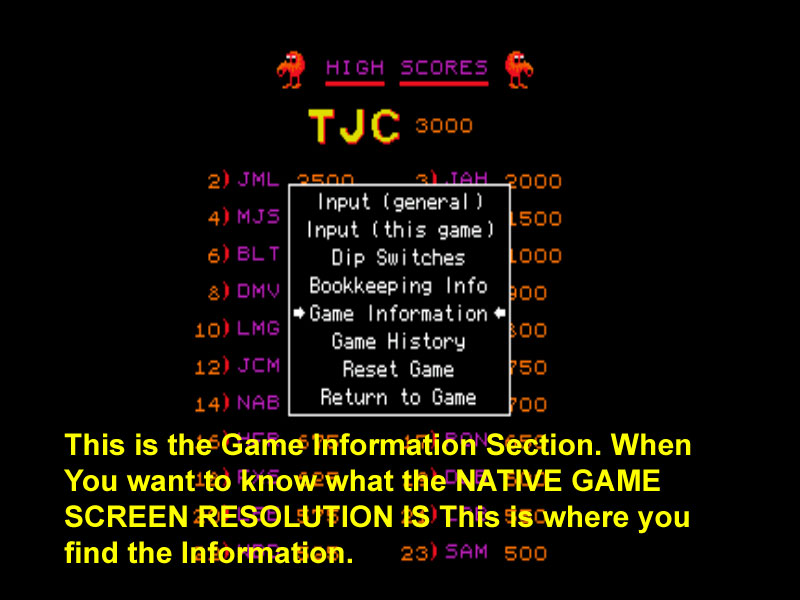


If you notice a game does not "look" the right way or the "buttons are not working correctly" then you will have to change the video or key functions with these menu instructions. Once you do it 2 or 3 times it will probably only take you about 30 seconds to change games in the future.
Here are your video card "default" resolutions. This will cover *MOST* games but some it will not. You need to use "trial and error" to find the resolution which works best for you. Follow the instructions I have included here to change the resolutions and to update the custom resolutions in the mame.cfg file.

++++++++++++++++++++++++++++++++++++
CHANGING THE "ESCAPE OUT OF THE GAME MENU TO WINDOWS KEY" (usually the black key)


*refer to the images above for these instructions
1. "escape" all the way out of the main MAME game menu to
WINDOWS
2. Use the trackball and go to MY COMPUTER (then double click on it)
3. Use the trackball and select the "C:" drive (then double click on it)
4. Look in the directory listing for a "GLAUNCH" folder (there actually may be 2
that we have to check for to make sure both are correct).
5. If you see the C:\GLAUNCH folder use the trackball and double click on the "GLAUNCH"
folder
6. You should see a list of files. We are looking for the GLAUNCH.CFG file.
WARNING: there are several files in there caled GLAUNCH (glaunch.cfg,
glaunch.dat, glaunch.exe, glaunch.sta).
7. The way you can tell the files are you can either SINGLE CLICK to select each
one and then do a RIGHT CLICK then go to PROPERTIES to tell you the name *OR*
you can go to the top of the OPEN WINDOW (You should see words like FILE, EDIT,
VIEW, et.c...) and single click on the VIEW word then go down and select DETAILS
- that should make another column that you can see everything (see the attached
menuopen.jpg file.
8. Once you find the GLAUNCH.CFG file simply double click on it and the file
will open
9. Please refer to the Menu Escape Key.BMP file attached - you will basically
scroll down the file until you find the part that says # Default: ESC = 59 that
is the command which lets you escape from the menu. We can assign any key to
that. The BLACK key on your game joystick is the main ESCAPE key and has the
programming of a "p" key. In Hexadecimal terms the "p" key equates to the number
16
10. Simply delete the number 59 and use the supplied computer keyboard to put in
the number 16
11. Once that is done go to the top of the OPEN window and do a FILE then SAVE
and you should be all set. Also if you just close the GLAUNCH.CFG file it should
ask you if you want to save, just say YES
12. THAT'S IT! You should be ready to go now with your new menu escape key.
13. FINALLY, please check on your system (see steps #2, #3 and #4 above) to see
if there is a C:\MAME\GLAUNCH directory. As we said in step #4 above there may
be 2 GLAUNCH directories on your system we want to make sure BOTH are changed
(if you have 2 GLAUNCH directories).
14. Basically, DOUBLE CLICK ON the C: drive, then DOUBLE CLICK ON the MAME
folder and then look for a GLAUNCH folder. If you see one DOUBLE CLICK ON the
GLAUNCH folder. Simply repeat steps #5 through #12 and then both files will be
changed (if you have both files)
***BE WARNED*** we will not take any responsibility or service calls if you
modify any of the other variables in the GLAUNCH.CFG file. Any incorrect
modifications could prohibit your whole game from working.
++++++++++++++++++++++++++++++++++++
THE TRACKBALL AND/OR THE SPINNER WON'T WORK IN WINDOWS
OR THE GAMES
PLEASE NOTE: Some of the computers need to remain plugged in (not turned on) in order for them to “remember” that the spinner and trackball are plugged in. The way you can make sure this is all “set correctly” is to follow these instructions:
1. Boot up arcade machine
2. When the main game menu comes up – escape out (via keyboard or QUAD black escape key)
3. Unplug the spinner (if it is using the USB port). Now plug the USB (spinner) back in and you should hear a “beep” indicating that the spinner is active.
4. Unplug the trackball (if plugged in via USB – not necessary if PS/2). Now plug the USB (trackball) back in and you should hear a “beep” indicating the trackball is active.
5. Double click back on the game launch menu icon to bring up the menu – or simply reboot the PC
You should now have totally functional spinner and
trackball. For some reason – on some of the computers the USB “forgets” the
spinner and trackball are connected if it has been unplugged from power. This
commonly happens if the unit has been shipped. The first time it is set up at
your location – this should only have to be done once – unless it is unplugged
from the wall or the power outlet.
THE SOUND IN MY CABINET STOPPED WORKING - I CANNOT HEAR ANYTHING.
This issue could be one of many things. Please refer to
this audio/sound checklist as a way to troubleshoot the audio in the cabinet
1. Make sure the SUBWOOFER is plugged in and the power on. This may sound
trivial but that plug from the subwoofer can get unplugged pretty easily.
2. Test to see if you can hear any WINDOWS sounds. Under windows go to the
directory c:\winxp\media (or equivalent) to find a *.WAV file. Simply open the
file (make sure the control knob for the sound on the left side of the cabinet
is turned up) and see if you hear sounds. What we are trying to do is to isolate
if this is a “windows” issue or a MAME.
3. Go go start/settings/control panel/system/hardware/device manager and under
the list of devices look under sound, video and game controllers and make sure
the sound devices are in there
4. On the bottom task bar of windows (lower right) there should be a grey icon
of a speaker. Double click on that and make sure that none of the channels are
MUTED that could stop any sound – you can also push up the volume on any of
them.
5. On the back of the computer the GREEN TIPPED WIRE needs to be plugged both on
the back of the subwoofer and in the back of the computer in the middle green
port – make sure you really stick it in there – sometimes it is hard to make
sure it is in all the way
6. In the back of the cabinet the subwoofer/computer speakers are actually
hardwired together with the Excalibur system. Near the back of the computer you
should be able to trace a “brown and red” wire set that are actually spliced
together (with electrical tape) with the computer speakers. Possibly these wires
came apart which would result in no sound.
7. Go go start/settings/control panel/sounds and audio devices then to the audio
tab. The default device should be the same for both sound playback and recording
– there should be something in both those boxes.
8. You can go under the computer’s system BIOS to make sure that the internal
sound card is still enabled. It *should not be this* but I mention it anyway. If
you need directions on how to check that let me know.
9. Take a normal/regular computer speaker set and simply plug it in the back of
the computer to see if you get sounds out of those. That will determine if it is
the computer itself or the cabinet’s wiring.
10. If you are getting sound through windows – my guess is that there is a
setting within MAME that got messed up. Go ahead and try launching space ace or
dragon’s lair. You can also launch MAME32 to see if you get sounds out of any of
those.
Check any/all of these in any order. My bet is that one or more of these could
be the issue.
++++++++++++++++++++++++++++++++++++
THE CABINET WILL NOT TURN ON OR BOOT UP
As described in the "unpacking and first time power on" sections at the top of this document. If you have verified that all the computer components are "seated" properly (mainly the video card and the sound card) and your system is still not powering up these are the things to check:
1. Is the power cord from the computer plugged in to the
power strip?
2. Is the power strip plugged in to the outlet?
3. Is the power strip turned on?
4. Is the power switch on the back of the computer set to the ON position?
After checking the power connections we need to examine the power switch. In the
unlikely instance that during shipment the power switch gets unplugged here are
the steps to verify operation and get back to working condition.
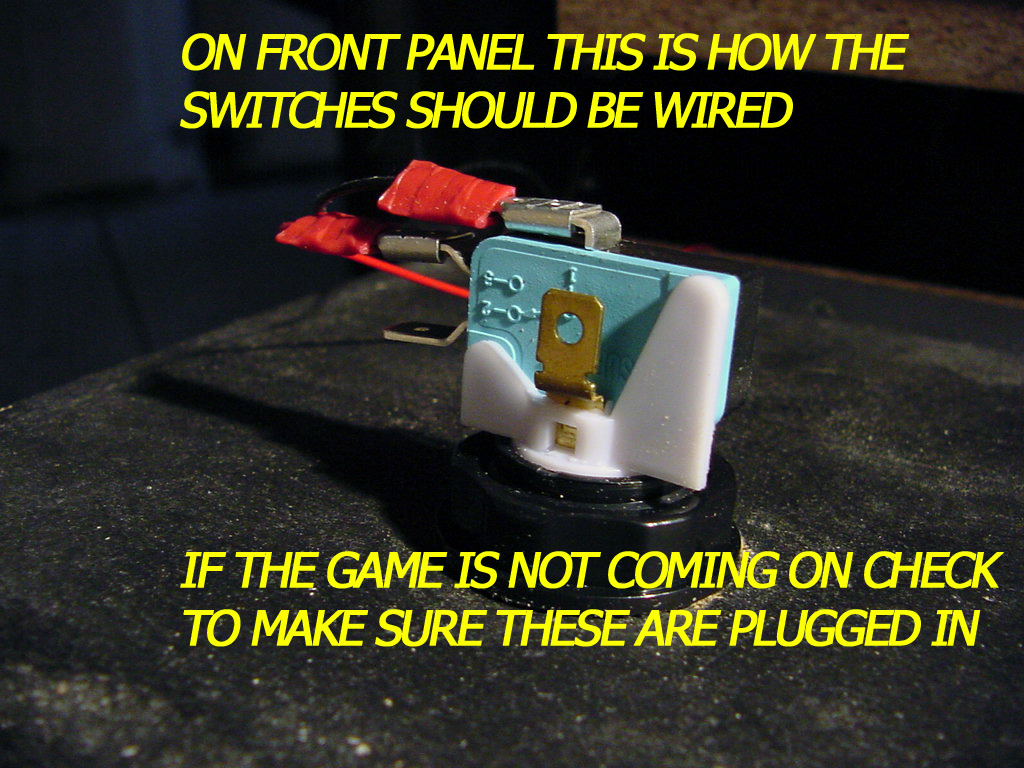
The first thing you need to do on the front panel is open the keyboard
compartment door to make sure the power switch is still intact. There are 2
wires to verify - as indicated with the 2 pictures below make sure these wires
are properly connected in the correct position. If one came unplugged, simply
re-plug it back on the appropriate terminal (it does not matter which wire goes
on either terminal - just make sure both are plugged in)

If you have verified that the front panel wires are still
intact we now need to examine if the internal wire on the computer motherboard
got unplugged by accident. In order to do this operation you will need to
FIRST unplug all the wires from the back of the computer
and then open the side cover on the computer so you can view the system
motherboard. We will be looking to verify that the power cable connectors are
still plugged in to the proper location on the motherboard. we will be referring
to the 2 pictures below...please also note that inside the "side" cover on the
computer you should also have a motherboard diagram that we will refer to.
Please locate the 14 pin terminal pictured below and make sure the wires are
plugged in to the proper terminals (ON/OFF) according to the diagram.
Now that you have verified that the FRONT WIRE and the COMPUTER MOTHERBOARD
CONNECTIONS are good go ahead and try to turn on the power to the system and
everything should come up properly.


++++++++++++++++++++++++++++++++++++
HOW TO BYPASS THE "TYPE OK TO CONTINUE" SCREENS
Follow the simple instructions below to pass by the "type ok to continue" with your joystick! NEVER have to use the computer keyboard!
When you launch a game, if you ever see the "MAME" program bringing up a dialog window that says "TYPE OK TO CONTINUE" or "THIS GAME HAS VIDEO PROBLEMS" or something else....you don't need to TYPE anything, just move any joystick "LEFT" then "RIGHT" and the warning screen should go away with no problem (see picture below)

+++++++++++++++++++++++++
Links For Additional Information
The Ultimate MAME Site:
http://www.mameworld.net/
Windows COPY/PASTE:
http://www.dreamauthentics.com/windows.htm
Wells Gardner 33" Arcade Monitor Technical
Manual:
http://www.dreamauthentics.com/megadocs/wgpics/wg33tech1.jpg (Page 1 JPG format)
or Photoshop PSD Format @ 2MB
http://www.dreamauthentics.com/megadocs/wgpics/wg33tech2.jpg (Page 2 JPG format)
or Photoshop PSD Format @2MB
http://www.dreamauthentics.com/megadocs/wgpics/wg33tech3.jpg (Page 3 JPG format)
or Photoshop PSD Format @ 2MB
http://www.dreamauthentics.com/megadocs/wgpics/wg33tech4.jpg (Page 4 JPG format)
or Photoshop PSD Format @ 2MB
Want to see all the games that work on your machine? http://www.dreamauthentics.com/gamelist.txt
Light Gun Users: Here is a link to all of the games you can play on the cabinet with the Light Gun: http://www.dreamauthentics.com/lightgun.html
**NOTE: MAME32 IS THE ONLY PROGRAM THAT SUPPORTS LIGHT GUNS. You will NOT be able to use the light gun in the main Game menu. You will need to escape out of the main Game menu and start the MAME32 program.